Steps for monitoring App Volumes with Log Insight Manager

The first step in this process is to install Log Insight Agent on ONE App Volumes Server per instance.
1. From the Log Insight Manager web portal navigate to the top-corner of the page selecting the three lines
2. Select ‘Administration’

3. Select ‘Agents’
4. Select the dropdown under ‘Agents’
5. Select ‘+ NEW GROUP’

6. Fill out the group name, i.e. ‘App Volumes Managers’
7. Select ‘New Group’

8. Select the dropdown under ‘Agents’ again and this time select your new Agent Group
9. From the dropdown select ‘IP Address’ (default)
10. Select ‘matches’
11. Manually enter the IP address for your App Volumes Manager instances. In this example, I have two sites aka two instances. The IP I am providing is the Load-balanced IP. You can also just put the direct broker IP for testing but we recommend App Volumes Managers be fronted with a load balancer.
12. Select ‘Refresh’
13. After selecting ‘Refresh’ you will see the App Volume Managers that you added in step eleven. If your servers do NOT populate continue until the end of the steps outlined.
14. Enable auto-update for all agents

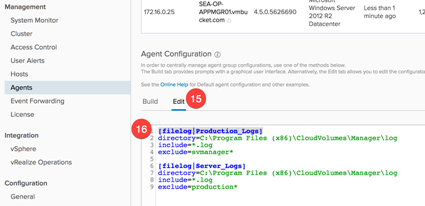
15. Select ‘Edit’
16. Copy-past the following content into the dialog:
[filelog|Production_Logs]
directory=C:\Program Files (x86)\CloudVolumes\Manager\log
include=*.log
exclude=svmanager*
[filelog|Server_Logs]
directory=C:\Program Files (x86)\CloudVolumes\Manager\log
include=*.log
exclude=production*

17. Select ‘Save Agent Group’

18. Finally, select ‘Refresh’ to validate your servers are populated

If you have completed all the above steps and still do NOT see your App Volume Managers in the agent list after selecting ‘refresh’ you could have something blocking traffic from the Managers to the Log Insight Collector. You do not need to manually edit any files local to the App Volumes Managers. When validating if data is collecting from dashboards you should wait a minimum of five to ten minutes after following the steps in this blog.
