Horizon Install Order and Silent Installs
This blog post is regarding the correct order of installing/Uninstalling Horizon Agents, Silent Installs/Uninstalls, and enabling FIPS.
VMware Horizon Install Sequence Order

Installation of various user experience, environment and VDI agents can cause unexpected issues of fail completely if installed in the incorrect order.
If you need to upgrade the Horizon View Agent you will need to reverse this process from the bottom-up.
1. Hypervisor Tools
- For VMware Tools installation, see General VMware Tools installation instructions (1014294)
- For physical desktops, skip this step
- For VMs running on other hypervisors, please consult the developers website for any required tool installations
2. VDI Agent
- For VMware View Agent installation, see Install View Agent on a Virtual Machine
- For XenDesktop Agent installation, see http://support.citrix.com/proddocs/topic/xenapp-xendesktop-76/xad-build-new-enviroment.html
- For other VDI deployments, please consult the developers website for required agent installation instructions
- For non-VDI environments, skip this step
3. VMware vRealize Operations Manager Agent
- If you have a View 5.0 or 5.1 environment, you must manually install the desktop agent on your desktops. The vROPs Agent is included with the Horizon View agent 5.2 or later.
4. VMware vRealize Log Insight Agent
- If Log Insight is not deployed in the environment, skip this step.
4. VMware User Environment Manager (UEM) Agent (formerly Immidio Flex+)
- If VMware UEM is not deployed in the environment, skip this step.
5. VMware App Volumes Agent
- If VMware App Volumes is not deployed in the environment, skip this step.
Horizon View, Silent Install Instructions:
Paul Grevink has a good blog that walks through the View Agent components:
https://paulgrevink.wordpress.com/2016/07/16/view-agent-what-is-installed/
1. In the View desktop, go to Start > Run, type regedit, and click OK. The Registry Editor window opens.
2. Navigate to:
HKEY_LOCAL_MACHINE\SOFTWARE\Microsoft\Windows\CurrentVersion\Uninstall
3. Find the value that corresponds to the version of View Agent software that is installed. For example:
View 4.5 – {6F862EF7-F25E-4B3B-8345-FA005F12F668}
View 4.6 – {EFF57BA4-5BF2-403E-84BC-3469F9DAAACD}
View 5.0 – {5DD04237-3DCD-4735-BF8F-3BEEC0F61A6E}
View 5.1 – {CDA7820C-4849-4E55-A7B1-38E175B5F61C}
View 5.2 – {58D47F5C-618E-11E2-8D25-74C36188709B}
View 5.3 – {E3AD16CE-E5D6-4844-98FF-75E96EF7377F}
View 6.0 – {1230DF2B-7BA0-4AAD-80EA-527A3C3614D4}
View 6.1 – {A2E9FEAC-6D18-4890-9428-A6F53D600E01}
4. To silently uninstall the View Agent, go to Start > Run, type cmd, and click OK.
5. The command prompt opens launch a command prompt and run this command:
MsiExec.exe /X {AGENT_VALUE} /forcerestart /qn
Where the AGENT_VALUE is the value noted in Step 3.
VMware Horizon View, Silent Uninstall Instructions:
https://kb.vmware.com/s/article/2064845
VMware vRealize Log Insight Manager, Silent Install Instructions:
- Log in to the Windows machine on which to install or update the vRealize Log Insight Windows agent.
- Open a Command Prompt window.
- Change to the directory where you have the vRealize Log Insight Windows agent .msi file.
- Run the following command to install or update with default values. Replace Version-Build_Number with your version and build number.
The /quiet option runs the command silently, and the /lxv option creates a log file in the current directory.
Drive:\path-to-msi_file>VMware-Log-Insight-Agent-Version-Build_Number.msi /quiet /lxv* li_install.log
(Optional) : Specify a user service account for the vRealize Log Insight Windows agent service to run under.
Drive:\path-to-msi_file>VMware-Log-Insight-Agent-*.msi SERVICEACCOUNT=domain\user SERVICEPASSWORD=user_password
VMware User Environment Manager, Silent Install Instructions:
Syntax:
msiexec.exe /i “VMware User Environment Manager 9.2 x64.msi” /qn INSTALLDIR=”C:\Program Files\Immidio” ADDLOCAL=”FlexProfilesSelfSupport” LICENSEFILE=”\\filesrv1\share\VMware UEM.lic” /l* InstallUEM.log
Examples:
msiexec.exe /i “VMware User Environment Manager 9.2 x64.msi” /qn INSTALLDIR=”D:\Apps\VMware UEM” ADDLOCAL=”FlexProfilesSelfSupport” LICENSEFILE=”\\filesrv1\share\VMware UEM.lic” /l* InstallUEM.log
msiexec.exe /i “VMware User Environment Manager 9.2 x64.msi” /qn INSTALLDIR=”D:\Apps\VMware UEM” ADDLOCAL=”FlexProfilesSelfSupport” LICENSEFILE=”\\filesrv1\share\VMware UEM.lic” /l* InstallUEM.log\Flex Profiles\FlexEngine.exe
VMware App Volumes, Silent Install Instructions:
Syntax:
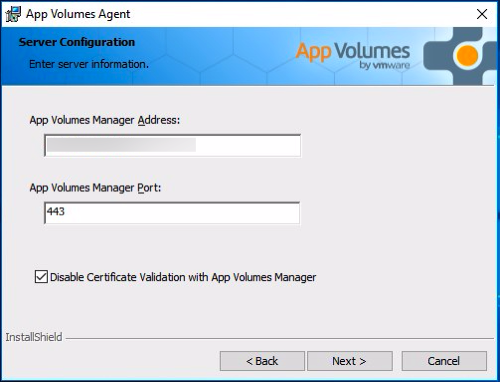
msiexec.exe /i “App Volumes Agent.msi” /qn MANAGER_ADDR=<Manager_FQDN/IP> MANAGER_PORT=<port>
Example:
msiexec.exe /i “App Volumes Agent.msi” /qn MANAGER_ADDR=appvm.vmbucket.com MANAGER_PORT=443
VMware App Volumes, Silent Upgrade Instructions:
- Open a Windows command prompt on your machine.
- Type the following command to upgrade the agent:
msiexec.exe /i “App Volumes Agent.msi” /qn REINSTALLMODE=vomus REINSTALL=ALL
Disabling EnforceSSLCertificateValidation with REGKEY

You can disable SSL certificate validation after you have installed the App Volumes agent. To do this manually make the modification to registry to create your own .reg file to import. You will need to disable EnforceSSLCertificateValidation if you have FIPS enabled in your environment.
Registry location, set value to ‘00000000’ to disable:
[HKEY_LOCAL_MACHINE\SYSTEM\CurrentControlSet\Services\svservice\Parameters] “EnforceSSLCertificateValidation”=dword:00000000
Registry file import command: regedit.exe /s path of .reg file
Example of importing a registry file:
reg import c:\location\regfile.reg
Rarely needed, unless your organization has a hard security requirement, you may need to enable FIPS mode. Please keep in mind, enabling FIPS mode, can break a lot of things if not properly setup. You can Enable or disable the FIPS setting via a registry setting, GPO, or Local Policy. To check whether FIPS is enabled or disabled in the registry, follow the following steps:
- Press Windows Key+R to open the Run dialog.
- Type “regedit” into the Run dialog box (without the quotes) and press Enter.
- Navigate to “HKEY_LOCAL_MACHINE\System\CurrentControlSet\Control\Lsa\FipsAlgorithmPolicy\”.
- Look at the “Enabled” value in the right pane.
- If it’s set to “0”, FIPS mode is disabled. If it’s set to “1”, FIPS mode is enabled.
- To change the setting, double-click the “Enabled” value and set it to either “0” or “1”.
- Restart the computer.
FIPS mode needs to be enable on the Windows servers and on the golden image.
For more information on FIPS mode, visit https://docs.vmware.com/en/VMware-Horizon-7/7.0/com.vmware.horizon-view.installation.doc/GUID-8A3ACF3D-05C5-4216-BD79-A53A72EE1D91.html
